1 Getting Started 首先跟着hexo官方文档走一遍:https://hexo.io/docs/
安装git:https://hexo.io/docs/#Install-Git
安装Node.js:https://hexo.io/docs/#Install-Node-js
安装hexo
1 2 npm install -g hexo-cli
初始化blog
1 2 3 4 5 6 mkdir blogcd bloghexo init
初始化好后,目录下有这么些东西
_config.yml:blog的配置文件,yaml语言
package.json:存储的是一些blog安装信息,比如一些dependencies
scaffolds:存储新建页面的模板
source:blog的主要文件,hexo会渲染这里面的文件,隐藏文件,文件或文件夹名以_开头不会进行渲染,_post文件夹除外
themes:主题文件夹,最需折腾的一个地方
其实到这里再运行一下hexo g && hexo s就可以在本地欣赏你的blog了,默认地址是:https://localhost:4000 ,但是问题是,样式有点丑,折腾theme吧
修改theme
这里我采用的是既然大家都在用,那我也来用用的NexT主题,是的我们要换一个官方文档了:https://theme-next.org/docs/
安装theme:https://theme-next.org/docs/getting-started/installation
1 2 git clone https://github.com/theme-next/hexo-theme-next themes/next
好了,准备工作做好了,开始配置吧
2 Configuration 2.1 hexo 打开hexo的配置文件我们来欣赏一下配置文件
欣赏优雅的配置文件,还好这文件不算太长,我就一句一句加注释吧,参考官网:https://hexo.io/docs/configuration
1 2 3 4 5 6 7 8 9 10 11 12 13 14 15 16 17 18 19 20 21 22 23 24 25 26 27 28 29 30 31 32 33 34 35 36 37 38 39 40 41 42 43 44 45 46 47 48 49 50 51 52 53 54 55 56 57 58 59 60 61 62 63 64 65 66 67 68 69 70 71 72 73 74 75 76 77 78 79 80 81 82 83 84 85 86 87 88 89 90 91 92 93 94 95 96 97 98 99 100 101 102 103 104 105 106 107 108 109 110 111 112 113 114 115 116 117 118 119 title: Sidney God subtitle: Keep quiet time for time description: You laugh at me for being different, but I laugh at you for being the same. keywords: Sidney, Ding, Sidney Ding author: Sidney Ding language: en timezone: Asia/Shanghai url: https://sidneygod.coding.me root: / permalink: posts/:abbrlink/ permalink_defaults: source_dir: source public_dir: public tag_dir: tags archive_dir: archives category_dir: categories code_dir: downloads/code i18n_dir: :lang skip_render: README.md new_post_name: :title.md default_layout: post titlecase: false auto_spacing: false external_link: true filename_case: 0 render_drafts: false post_asset_folder: true relative_link: false future: true highlight: enable: true line_number: true auto_detect: false tab_replace: true index_generator: path: '' per_page: 10 order_by: -date default_category: uncategorized category_map: tag_map: date_format: YYYY-MM-DD time_format: HH:mm:ss per_page: 10 pagination_dir: page theme: next deploy: type: git repo: github: git@github.com:SidneyGod/SidneyGod.github.io.git gitee: git@gitee.com:SidneyGod/SidneyGod.git coding: git@git.dev.tencent.com:SidneyGod/SidneyGod.git branch: master feed: type: atom path: atom.xml limit: 20 order_by: -date icon: icon.png autodiscovery: true search: path: search.xml field: post format: html limit: 999 symbols_count_time: symbols: true time: true total_symbols: true total_time: true exclude_codeblock: false abbrlink: alg: crc32 rep: hex
好了,hexo的配置文件完了,再举个例子,怎么安装依赖吧,就举那个abbrlink吧
先打开上面那个地址:https://github.com/Rozbo/hexo-abbrlink
然后跟着他的步骤走一遍
1 2 3 4 npm install hexo-abbrlink --save vim _config.yml
一个是permalink: posts/:abbrlink/,如果你把它修改成permalink: p/:abbrlink/和简书的地址长得就很像了:joy:
另一个就是在下面添加
1 2 3 4 abbrlink: alg: crc32 rep: hex
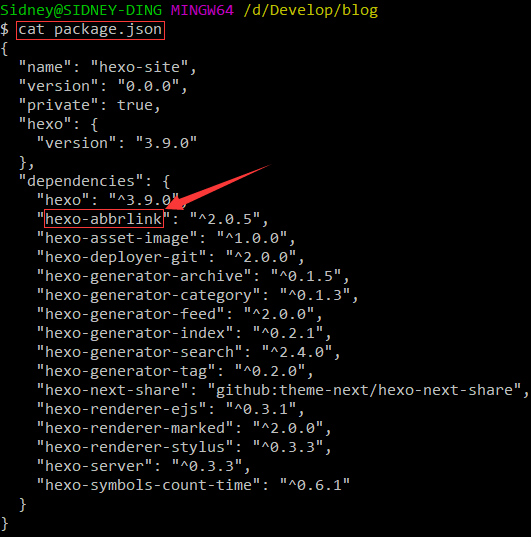
嗯,安装好了,下一个…很简单,对不对,那么问题来了,如果安装了一个插件,然后觉得不好了,咋卸了它呢?直接执行
1
2
npm uninstall hexo-abbrlink
要是忘了这个插件名,怎么办?丢个图,自己体会
好了hexo的配置告一段落
关于评论的配置,参考:https://www.jianshu.com/p/f4658df66a15
2.2 NexT 接下来看next的配置文件,我们还接着一行一行注释吧,不!我拒绝,1000来行呢,我愿意,这看着也不舒服。丢个网址自己看:https://theme-next.org/docs/theme-settings/
说说插件吧,其实套路都一样
1 2 3 4 5 6 7 8 symbols_count_time: separated_meta: true item_text_post: true item_text_total: true awl: 4 wpm: 275
看到没,上面又有地址,这摆明了让你打开它,不打开它都不对不起它对你招了又招的小手:https://github.com/theme-next/hexo-symbols-count-time
然后你看到了吧,又是安装
1 npm install hexo-symbols-count-time --save
然后改配置
1
2
3
4
5
6
7
symbols_count_time: separated_meta: true item_text_post: true item_text_total: false awl: 4 wpm: 275 suffix: mins.
要勇于尝试,还有看到别人家有的特效,都可以找找,不过特效越多,加载可能就会慢一点,毕竟文件多了嘛
3 Beautify 有了物质基础,当然要享受了,关于美化NexT的文章多得不得了,但是大多针对的是之前的NexT,有的美化可能需要修改*.styl文件什么的,其实没必要,新版本的NexT已经集成了那些特性,修改配置文件就有了
我比较懒,推荐几篇文档:
hexo的next主题个性化配置教程
NexT主题的优化定制修改指南
如何给个人博客换上专属免费域名
还有自己搜索去吧…
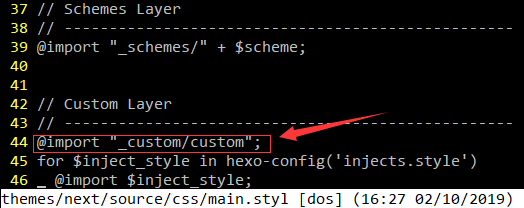
对前端有了解的话,肯定知道,静态页面咋改都行,浏览器慢慢调试就是咯,NexT之前是有预留_custom.styl给用户自己修改css样式的,现在需要加点东西
1 vim themes/next/source/css/main.styl
首先说明,我并不懂这语法,也不想学,但是按照模样修改还是可以的
就加了那句红框,然后在这个目录下创建_custom目录,再创建custom.styl文件,下面给出我的自定义css样式
1
2
3
4
5
6
7
8
9
10
11
12
13
14
15
16
17
18
19
20
21
22
23
24
25
26
27
28
29
30
31
32
33
34
35
36
37
38
39
40
41
42
43
44
45
46
47
48
49
50
51
52
53
54
55
56
57
58
59
60
61
62
63
64
65
66
67
68
69
70
71
72
73
74
75
76
77
78
79
80
81
82
83
84
85
86
87
88
89
90
// Custom styles. // 文章内链接文本样式 .post-body p a { color : #0593d3 ; border-bottom : none; border-bottom : 1px solid #0593d3 ; &:hover { color : #fc6423 ; border-bottom : none; border-bottom : 1px solid #fc6423 ; } } // 文章背景半透明 .content { border-radius : 20px ; //文章背景设置圆角 padding : 10px 50px 20px 50px ; background :rgba (255 , 255 , 255 , 0.8 ) none repeat scroll !important ; } .post-block { margin-top : 10px ; background : rgba (255 , 255 , 255 , 0 ) none repeat scroll !important ; } .post { background : rgba (255 , 255 , 255 , 0 ) none repeat scroll !important ; box-shadow : 0 0 0 0 rgba (0 , 0 , 0 , 0 ), 0 0 0 0 rgba (0 , 0 , 0 , 0 ), 0 0 0 0 rgba (0 , 0 , 0 , 0 ); } .page { background : rgba (255 , 255 , 255 , 0 ) none repeat scroll !important ; box-shadow : 0 0 0 0 rgba (0 , 0 , 0 , 0 ), 0 0 0 0 rgba (0 , 0 , 0 , 0 ), 0 0 0 0 rgba (0 , 0 , 0 , 0 ); } // 去除页面底部页码上面的横线 .pagination { border : none; margin : 0px ; } // 去掉图片边框 .posts-expand .post-body img { border : none; padding : 0px ; } .post-gallery .post-gallery-img img { padding : 3px ; } .posts-expand .post-title { font-size : 26px ; font-weight : 700 ; letter-spacing : 1px ; } // 去除在页面文章之间的分割线 .posts-expand .post-eof { margin : 0px ; background-color : rgba (255 , 255 , 255 , 0 ); } // 选中文字部分的样式 ::selection { background-color : #222222 ; color : #fced6d ; } // 鼠标样式 * { cursor : url ("/./cursor/pointer.ico" ),auto!important } :active { cursor : url ("/./cursor/click.ico" ),auto!important } // fonts @font-face { font-family : 'DFGirlFull' ; src : url ('/fonts/DFGirlFull.ttf' ); font-weight : 400 ; } @font-face { font-family : 'ModernAntiqua' ; src : url ('/fonts/ModernAntiqua.ttf' ); font-weight : 400 ; } @font-face { font-family : 'Monaco' ; src : url ('/fonts/Monaco.ttf' ); font-weight : 400 ; }
这个文件中的鼠标样式和字体需要自己提供,置于位置,记住blog/themes/next/source就是根目录,然后放哪,你开心就好,这其实就是主题的核心样式位置,还有个布局格式在blog/themes/next/layout,难度不大
4 Deploy 4.1 写篇文章 一切都做好了,终于可以开始愉快的写blog了,新建一篇blog
然后就会在blog/source/_posts新建一个Article Name.md文件,打开这个文件你就可以写blog了。问题来了,这以后blog文章一旦多了,找md文件多费事,能不能在new完自动打开这个文件?当然能!hexo作者这点还是想到了的
首先在hexo目录的scripts目录中创建一个JavaScript文件,文件名随意,如果没有scripts那就创建一个,然后在js文件中添加这么段代码
Win:
1
2
3
4
5
6
7
var spawn = require ('child_process' ).exec ;hexo.on ('new' , function (data ){ spawn ('start "D:\Program Files\Typora\Typora.exe" ' + data.path ); });
Mac:
1
2
3
4
5
6
var exec = require ('child_process' ).exec ;hexo.on ('new' , function (data ){ exec ('open -a "markdown编辑器绝对路径.app" ' + data.path ); });
4.2 发布 写好了,那就发布吧
4.2.1 安装插件 1 2 3 4 npm install hexo-deployer-git --save vim _config.yml
上面说过的
1 2 3 4 5 6 7 8 9 10 11 12 deploy: type: git repo: github: git@github.com:SidneyGod/SidneyGod.github.io.git gitee: git@gitee.com:SidneyGod/SidneyGod.git coding: git@git.dev.tencent.com:SidneyGod/SidneyGod.git branch: master
4.2.2 创建仓库 github
创建好<用户名>.github.io仓库,git地址也是对的,就可以直接部署了,每次更新,github也会自动更新
毕竟github不在国内,可能访问速度有点慢
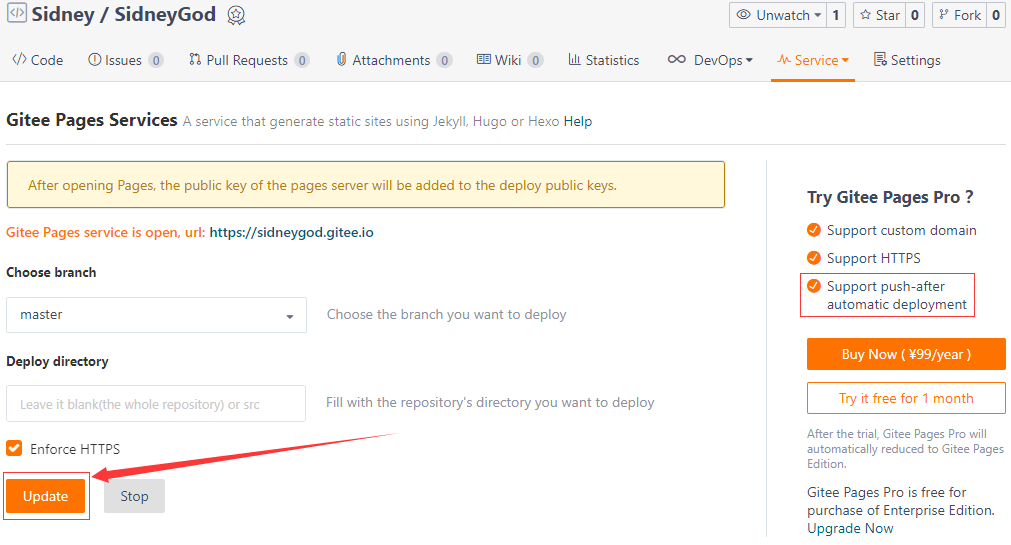
码云
创建好同名仓库,然后需要以下操作
进入仓库 > Service > Gitee Pages
点击Update
这不是只要做一次,而是你每次更新页面都需要手动去更新!!!
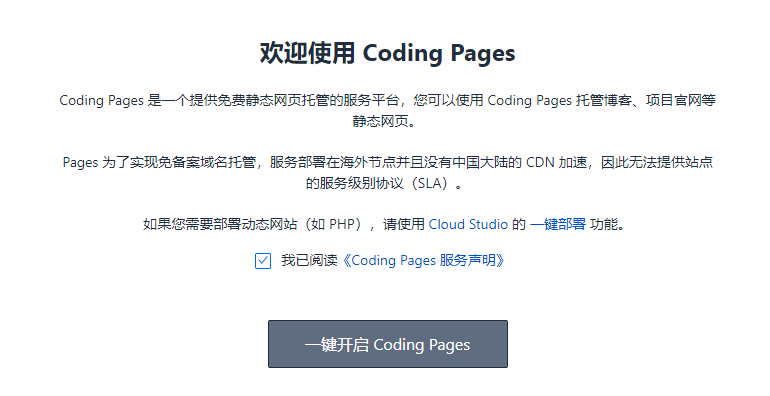
coding
创建好同名仓库,只需要做一次,之后会自动同步
进入仓库 > 代码 > Pages 服务
一键开启
已经被腾讯买了
4.2.3 hexo命令 这个时候就可以通过
1 2 3 4 5 6 hexo clean hexo g hexo d
这时候就可以通过
https://sidneygod.github.io/
https://sidneygod.coding.me/
https://sidneygod.gitee.io/
访问blog了